PWAs - How to install them
Progressive Web Apps - How to install them
What are they?
Originally announced in 2015, and first launched in 2016, PWAs have been around for a while, but in recent years started to gain traction, and will continue to grow in usage moving forwards.
PWAs blend websites and applications into a single experience. They are websites, but with the potential for limited access to local resources (like the camera or location of your phone, even push notifications).
They “install” on computers, phone and tablets and launch like an app, but unlike a traditional app, they don’t require updates from the Play Store or App Store (what seems like every other week with some apps - we all know those prompts about application X needs an update), and unlike a website, they don’t launch your entire Web browser to run.
Think of them as the best parts of a website with the best parts of having apps.
Some examples you might already be using and not even realise are
- Twitter Lite on mobile and Twitter on Windows 10 (via the Microsoft Store) and Android (via Google Play Store)
- Spotify app on Windows 10, Instagram in browsers on mobiles and as an app on Windows 10 via the Microsoft Store
- Disney+ on Windows 10
- Most Google apps (G Mail, Drive, etc) on Windows 10
- The newest version of Skype on Windows 10
- Outlook when installed from outlook.com
And millions of more sites. (Netflix is even working towards it’s apps being PWAs)
How to install a PWA
Android Phone & Tablet
Requirements
Microsoft Edge, Mozilla Firefox or Google Chrome (and others like Brave will work)
Process
- Open the website in the browser.
- A prompt should appear at the bottom of the screen to “Add <site name> to Home screen”, simply click it.
The app will be installed and appear in your “All Apps” list.
Alternatively -
Google Chrome
Once the website is open in the browser, click Settings > Add to Home screen
The app will be installed and appear in your “All Apps” list.
Microsoft Edge
Once the website is open in the browser, click Settings > Add to screen (you may have to open the settings drawer by dragging it up, to access the Add to screen link)
The app will be installed and appear in your “All Apps” list.
iPhone & iPad
Requirements
Operating System: iOS 11.3 and above
Process
- Open the website in Safari (or Chrome)
- Tap the Share button
- By sliding to the right, find Add to Home Screen
- Tap it, then tap Add (top right)
Alternatively follow the steps provided by Apple here .
Windows
Requirements
Browser: Microsoft Edge Chrome or Google Chrome
Operating System: Windows 10
Process
Google Chrome
- Open the website in the browser
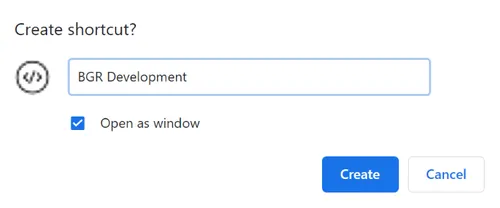
- Click Settings > Mote tools > Create shortcut…
- Give it a name, and click Open as window
- Click Create
The shortcut will now be on the desktop and on the Start menu, and when clicked, will launch like any other Windows application.

Microsoft Edge
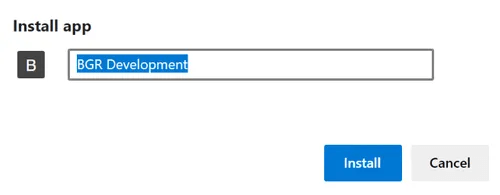
- Open the website in the browser.
- Click Settings > Apps
- Click Install this site as an app
- Give it a name and click Install
The shortcut will now be on the desktop and on the Start menu, and when clicked, will launch like any other Windows application.

Mac OS
Requirements
Browser: Google Chrome
Process
- Open the website in the browser
- Click Settings > Mote tools > Create shortcut…
- Give it a name
- Click Create
Linux
Requirements
Browser: Google Chrome
Process
- Open the website in the browser
- Click Settings > Mote tools > Create shortcut…
- Give it a name, and click Open as window
- Click Create
Chrome OS
Requirements
Browser: Google Chrome
Process
- Open the website in the browser
- Click Settings > Mote tools > Create shortcut…
- Give it a name, and click Open as window
- Click Create